
Fresh, tender okra picked straight from your garden tastes far better than store-bought vegetables. The good news is that learning how to grow okra at home is surprisingly easy, even if you’re a beginner. Okra, also known as ladyfinger or bhindi, grows well in warm climates and requires minimal maintenance once established.
Whether you have a backyard, terrace, balcony, or just a few large containers, growing fresh okra at home is simple with the right care and growing practices. In this guide, you’ll learn everything from selecting the best variety and sowing seeds to caring for your plants and harvesting tender, flavorful pods. If you’re looking to get started with high-quality seeds, you can also Buy hybrid Okra Online to enjoy better germination, vigorous growth, and a more productive harvest.
Why Grow Okra at Home?
Growing your own okra offers several benefits:
- Enjoy fresh, chemical-free vegetables.
- Save money on grocery bills.
- Harvest only what you need.
- Improve your gardening skills.
- Add greenery to your home garden.
Okra plants are fast-growing and continue producing pods for several weeks, making them one of the most rewarding vegetables for home gardeners.
1. Choose the Right Time to Plant Okra
Timing plays an important role in getting a healthy crop.
Okra Growing Season in India
The okra growing season in India depends on your region.
- North India: February to April and June to July
- South India: Almost year-round except during heavy monsoon
- Central and Western India: February to March and June to August
Okra thrives in warm temperatures between 25°C and 35°C. Avoid planting during extremely cold weather as seeds germinate poorly in low temperatures.
2. Select the Best Okra Varieties for Home Garden
Choosing suitable seeds can significantly improve your harvest.
Some of the best okra varieties for home garden include:
- Pusa Sawani
- Arka Anamika
- Parbhani Kranti
- Clemson Spineless
- Punjab Padmini
These varieties are known for excellent yield, disease resistance, and tender pods suitable for home cultivation.
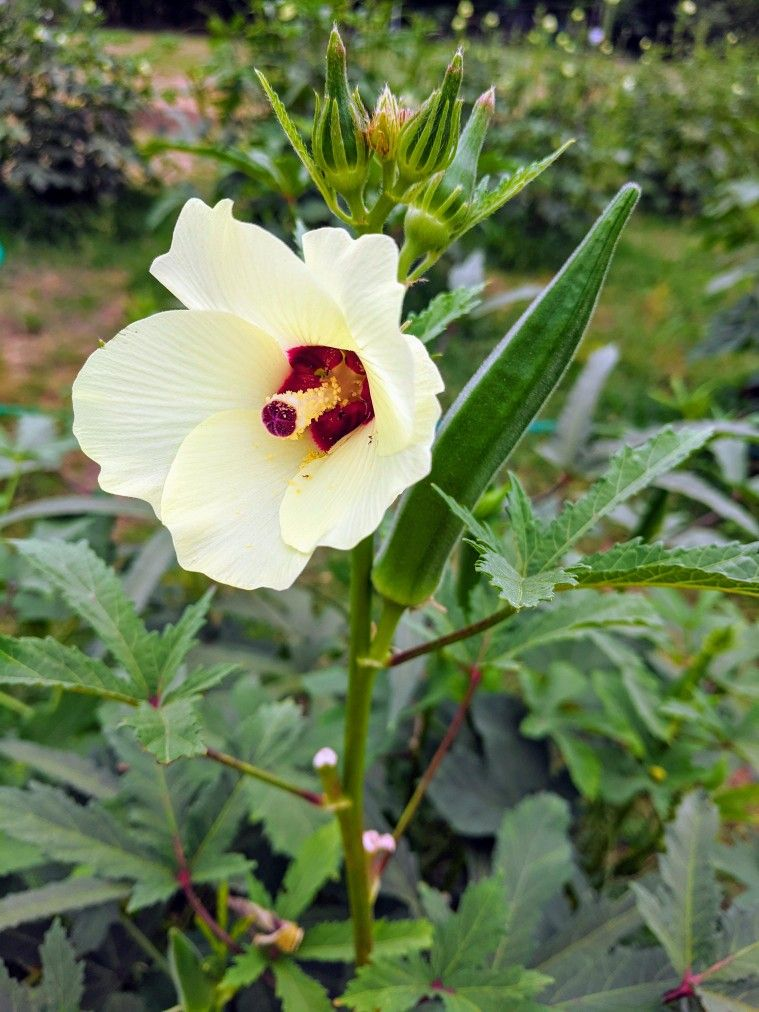
3. Choose a Sunny Location
Okra loves sunlight.
Select a location that receives at least 6 to 8 hours of direct sunlight daily.
If you’re growing in pots:
- Use containers at least 12–15 inches deep.
- Ensure drainage holes are present.
- Place the pots in the sunniest part of your balcony or terrace.
More sunlight usually means better flowering and higher production.
4. Prepare Nutrient-Rich Soil
Healthy soil leads to healthy plants.
Mix:
- Garden soil
- Compost or well-rotted manure
- Cocopeat
- Sand (optional for better drainage)
The ideal soil should be loose, fertile, and well-drained with a pH between 6.0 and 7.0.
Adding organic compost before sowing improves soil fertility naturally.
5. Sow the Seeds Properly
Now comes the most exciting part.
Before planting:
- Soak okra seeds in water for 8–12 hours.
- This softens the seed coat and speeds up germination.
Plant seeds:
- 1 inch deep
- Keep 12–18 inches between plants
- Water gently after sowing
Seeds usually germinate within 5–10 days under warm conditions.
6. Water the Plants Correctly
One of the biggest mistakes beginners make is overwatering.
Water the plants:
- Deeply once or twice a week.
- Increase watering during hot summer days.
- Reduce watering during rainy weather.
Keep the soil moist but never waterlogged.
Consistent watering encourages healthy root development and continuous pod production.
7. Follow Essential Okra Plant Care Tips
Proper maintenance ensures better yields.
Here are some useful okra plant care tips:
- Remove weeds regularly.
- Apply compost every 3–4 weeks.
- Mulch around plants to retain moisture.
- Support tall plants if they become heavy.
- Remove yellow or damaged leaves.
Inspect your okra plants regularly to spot pests early. Using a cocopeat 5 kg block improves soil health and root growth, helping your plants produce larger, tender, and healthier okra pods.
8. Practice Okra Companion Planting
Growing compatible plants together improves garden health.
Some excellent options for okra companion planting include:
- Basil
- Marigold
- Beans
- Peppers
- Cucumbers
These companion plants help:
- Attract pollinators
- Repel harmful insects
- Improve biodiversity
- Maximize garden space
Avoid planting okra too close to potatoes, as both may attract similar pests.
9. Protect Your Plants from Pests
Although okra is relatively hardy, some pests may appear.
Common problems include:
- Aphids
- Whiteflies
- Spider mites
- Fruit borers
Natural solutions include:
- Neem oil spray
- Soap water solution
- Hand-picking insects
- Encouraging beneficial insects like ladybugs
Avoid excessive chemical pesticides, especially if you plan to harvest regularly.
Healthy soil and good airflow naturally reduce many disease problems.
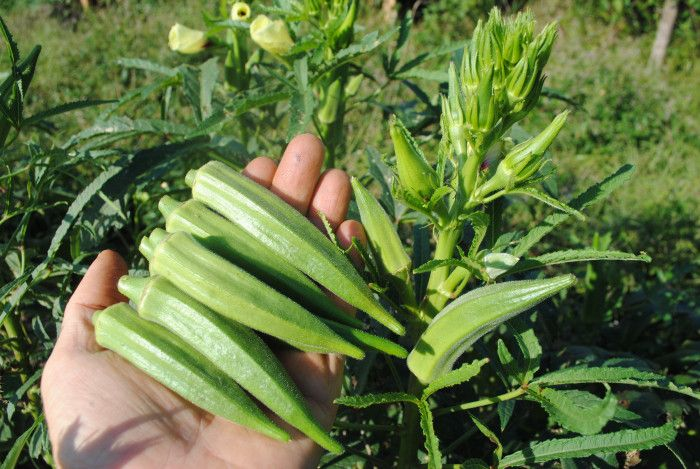
10. Harvest at the Right Time
The final reward is harvesting fresh okra.
Pods are usually ready 45–60 days after planting, depending on the variety.
Harvest when pods reach:
- 3–5 inches long
- Bright green
- Soft and tender
Use scissors or pruning shears instead of pulling the pods.
Harvest every 2–3 days because mature pods become fibrous and tough.
Frequent harvesting encourages the plant to produce even more vegetables.
Common Mistakes to Avoid
Many first-time gardeners struggle because of simple mistakes.
Avoid these common errors:
- Planting in shady locations
- Overwatering the soil
- Ignoring pest infestations
- Harvesting too late
- Using poor-quality seeds
- Skipping compost applications
Making small improvements can significantly increase your harvest.
Tips for Growing Okra in Pots
If you have limited space, don’t worry.
Okra grows well in containers if you:
- Choose large pots.
- Use nutrient-rich potting mix.
- Provide full sunlight.
- Water consistently.
- Feed organic compost every month.
Even a sunny balcony can produce plenty of fresh bhindi throughout the season.
Growing fresh, healthy okra at home is easier than you might think. With the right growing conditions, regular care, and a little patience, you can enjoy a continuous harvest of tender, homegrown pods throughout the season. Whether you’re planting in a garden, on a terrace, or in containers on your balcony, these simple steps will help you grow a thriving okra crop.
If you’re looking for premium-quality gardening products like cocopeat, coconut husk chips, and other sustainable growing solutions, Asia Flock is here to help. We provide eco-friendly products that support healthy plant growth and make home gardening more productive.
Ready to start your home gardening journey? Contact Asia Flock today to find the right growing solutions and give your plants the best possible start.
Also Read This Blog:-
How to Grow Green Chilli at Home: A Step-by-Step Guide for Pots, Balconies, and Kitchen Gardens
Frequently Asked Questions
Q1. How long does it take to grow okra at home?
Okra is usually ready for harvest within 45–60 days after sowing, depending on the variety and growing conditions.
Q2. What is the best okra growing season in India?
The ideal okra growing season in India is February to April and June to August in most regions, while southern states can grow okra almost year-round.
Q3. Can I grow okra in pots?
Yes. Okra grows well in containers that are at least 12–15 inches deep with good drainage and plenty of sunlight.
Q4. How often should I water okra plants?
Water deeply once or twice a week. During hot weather, increase watering if the soil dries out, but avoid waterlogging.
Q5. Which are the best companion plants for okra?
Basil, marigold, beans, cucumbers, and peppers are excellent choices for okra companion planting as they help attract pollinators and naturally reduce pest problems.